
First off, sorry about the photos. They came of "dark" even after I processed them. I was working on this necklace in my room last night just in time for my Institute Graduation Ceremony this morning. :) I only had one trusty Omni lamp with me.
I know what you're thinking and yes. This is a knock off of the Black Resin Triangle Necklace from House of Harlow 1960. But I gotta tell you it looks and feels legit! But more about this necklace in another post. I'll be reviewing the accessories I bought online. In this photo however, this necklace does not look like the original at all. :(

I was planning to use this necklace during my College Graduation Ceremony, but when my sister tried to untangle the necklace from my hair, it snapped!

When I checked what happened, it seems that the bead crimp cover was placed a tad too tight placing the beading wire with stress (uh-oh, engineering terms?). It only took a tiny tug for the whole piece to break.
So what do you do with a broken necklace? Pick all the pieces up and dump them in the garbage? NO. Just a few simple tweaks and you'll have this beauty fixed up in no time! :)
This tutorial is for ADVANCED beaders only. I wasn't able to picture each step well, so I'll be explaining the procedure mainly with words with a few supplementary pictures. Good Luck!
1. First thing you need to do is to salvage as much material as you can. If your necklace has a pattern like this one, you would want to lay them down according to how the different pieces are arranged so you will not have a hard time stringing them back together later. Also, save the original locks of the necklace (if they still work).

2. Next, cut a length of beading wire and add a crimp bead. String the lock like so.
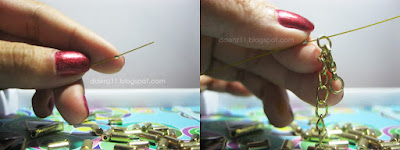
3. Loop the beading wire back into the crimp bead, and with a long nose pliers, crimp the bead in to place.

4. At this point, you can start stringing the beads, pendants and other elements of the necklace. Remember, to follow the original pattern of the neck piece. If you feel like changing the design a bit, adding a bead or pendant or what not, you can do so in this step. :)

5. Lastly, close the necklace by placing a crimp bead, the lock, looping the beading wire back and then crimping with a long nose pliers. Cut excess beading wire with your trusty scissors.
And that's it! Your necklace is as good as new. :)

The finished piece!
If you're new to beading, and wasn't able to follow the steps well, I'll try and make a more detailed tutorial on working with beading wire and crimp beads to make jewelry pieces. Hey, I have all summer! *wink*
No comments:
Post a Comment